Modern bathroom vanities have moved far beyond basic storage. They’re now the anchor of contemporary bathroom design, combining clean lines, smart materials, and functional layouts that work in everything from powder rooms to primary suites. Whether replacing a dated builder-grade cabinet or designing a full remodel, choosing the right modern vanity means balancing aesthetics with plumbing constraints, storage needs, and installation realities. This guide walks through the design principles, material choices, sizing considerations, and installation techniques that’ll help homeowners confidently select and install a vanity that looks sharp and lasts.
Table of Contents
ToggleKey Takeaways
- Modern style bathroom vanities prioritize clean lines, minimal ornamentation, and functional design with flat-panel doors, concealed hardware, and honest material use rooted in mid-20th-century modernism.
- Floating vanities are the hallmark of modern bathroom design, offering an airy aesthetic and easier floor installation, but require secure wall framing and exposed plumbing that must be visually coordinated.
- A modern style bathroom vanity should match your plumbing rough-in dimensions, with standard sink drains 16–20″ off the floor, and single-sink configurations work best for spaces under 60″ wide.
- Soft-close hardware, full-extension drawer glides, and undermount sinks are essential modern vanity features that enhance functionality and maintain the clean aesthetic by eliminating visible seams.
- DIY installation of a modern vanity is manageable in one to two days with basic plumbing and carpentry skills, but floating units on plaster walls or rerouted plumbing requires professional help.
- Quartz countertops dominate modern vanity designs due to their non-porous, seamless appearance, while thermofoil and matte lacquer finishes offer better durability and stain resistance than laminate.
What Defines a Modern Style Bathroom Vanity?
Modern style isn’t just a catch-all for “new-looking.” It’s a specific design philosophy rooted in mid-20th-century modernism: minimal ornamentation, functional form, and honest material use.
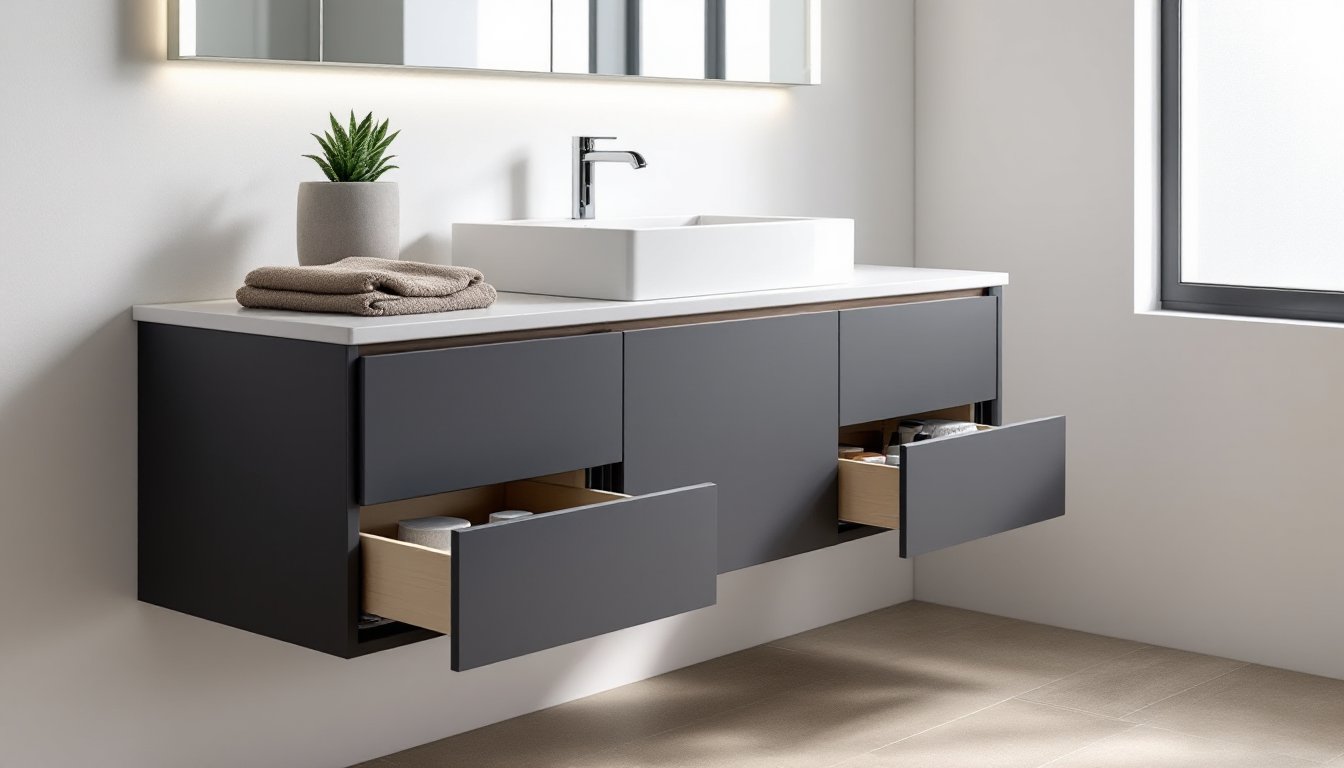
Typical characteristics include flat-panel cabinet doors (no raised panels or beadboard), horizontal emphasis in design lines, and concealed or integrated hardware. Many modern vanities skip decorative toe kicks in favor of recessed bases or legs that create visual lightness. Countertops tend to be simple slabs, quartz, solid surface, or concrete, rather than intricate edge profiles.
Color palettes lean neutral: white, gray, black, natural wood tones, or bold matte finishes like navy or charcoal. You won’t find ornate corbels, turned legs, or fussy moldings. Instead, the focus is on proportion, negative space, and material texture.
Modern vanities also prioritize function. Expect soft-close hinges, full-extension drawer glides, and clever interior organizers. Plumbing is often partially exposed in open-shelf or floating designs, so chrome or matte black P-traps become part of the aesthetic rather than something to hide. If the plumbing isn’t photogenic, consider upgrading to decorative trap kits available at most plumbing supply shops.
Popular Modern Vanity Styles and Materials
Floating Vanities
Floating (wall-mounted) vanities are the hallmark of modern bathroom design. They’re anchored directly to wall studs using a metal hanging rail or cleat system, leaving the floor clear beneath. This creates an airy look and makes tile or flooring installation simpler since you don’t need to cut around a base.
From a practical standpoint, floating vanities work best on solid framing. Locate studs with a stud finder and confirm they’re 2×4 or 2×6 solid wood or steel, not just drywall over metal furring. Most manufacturers recommend fastening into at least two studs spaced 16″ on center. If your wall is concrete or CMU block, use appropriate masonry anchors rated for the vanity’s loaded weight (cabinet + countertop + contents, typically 200–400 lbs).
Floating vanities range from 24″ to 72″ in width. Common depths are 18″ to 21″, which works in tighter spaces but may limit undermount sink options. Materials lean toward engineered wood with melamine or thermofoil finishes, plywood with lacquer, or MDF with high-gloss acrylic panels. Higher-end options use solid walnut, oak, or teak veneer.
One caution: Floating vanities expose plumbing. Plan for wall-mounted faucets or deck-mount styles with escutcheons that tidy up the countertop penetrations. Keep in mind that servicing the trap or supply lines means working in a more visible area, so quality fittings and neat braided supply lines are worth the investment.
Freestanding Contemporary Vanities
Freestanding modern vanities rest on the floor but maintain clean, minimalist profiles. Unlike traditional furniture-style pieces with feet or legs, these often feature recessed toe kicks (3–4″ high, set back 3″) or slim metal legs in matte black, brushed nickel, or powder-coated finishes.
These vanities suit renters or DIYers hesitant to mount heavy cabinets to walls. They’re easier to level on uneven floors using adjustable feet hidden in the base. Standard widths run 30″, 36″, 48″, 60″, and 72″: depths are typically 21″ or 22″ to accommodate standard oval or rectangular undermount sinks.
Material-wise, expect the same finishes as floating units, but freestanding vanities sometimes incorporate open lower shelving with metal or wood frames, a nod to industrial-modern crossover styles. When evaluating modern vanity solutions, consider how the base design affects cleaning access and visual weight in your space.
For countertops, quartz dominates the modern category due to its non-porous surface and wide color range. Solid surface (like Corian) offers seamless integration with integral sinks. Concrete and natural stone like honed granite or marble add texture but require sealing. Avoid laminate in modern installs, it reads dated and the seams break the clean-slab aesthetic.
Choosing the Right Size and Configuration
Start with plumbing rough-in dimensions. Standard bathroom sink drains sit 16–20″ off the floor (measured to centerline) and are typically centered left-to-right in the vanity footprint, though offset drains are common in older homes. Measure from the wall to the drain centerline and from adjacent walls to confirm your new vanity will align without relocating plumbing.
For tight spaces like powder rooms, 24″ or 30″ single-sink vanities are the minimum functional widths. Modern designs in this range often use vessel sinks or wall-mount faucets to free up deck space. In shared or primary baths, 48″ to 72″ double-sink configurations are standard, with sinks spaced at least 30–36″ apart for elbow room. Anything wider than 60″ may require a center support leg or toe kick panel to prevent sagging, especially with heavy stone countertops.
Depth matters more than many DIYers realize. Standard vanity depth is 21″, but modern wall-mount designs sometimes go as shallow as 16–18″. Shallow vanities can limit sink bowl depth and faucet reach, so test clearances before buying. If your bathroom allows, a 22–24″ depth improves storage and countertop workspace without overwhelming a standard 5′ × 8′ bath.
Single vs. double sink: If your bathroom is under 60″ wide, a single sink with ample counter and drawer space usually beats a cramped double setup. Building codes don’t dictate sink count, but do require adequate clearances: the IRC (International Residential Code) recommends at least 15″ from any sink centerline to a side wall and 30″ of clear floor space in front of the vanity.
When browsing design platforms like Houzz, filter by your actual available width and confirm rough-in compatibility before falling in love with a look.
Top Design Features to Look For
Soft-close hinges and drawer glides should be non-negotiable. Blum, Grass, or Hettich hardware adds $50–100 to a vanity’s cost but prevents slammed doors and extends longevity. Full-extension glides (rated for 75–100 lbs) let you access the back of deep drawers, critical for storing hair tools, cleaning supplies, or plumbing access panels.
Integrated or handleless designs use push-to-open mechanisms or recessed grips milled into door edges. This maintains clean lines but can be tricky with wet hands. If you prefer pulls, look for slim bar handles in matte black, brushed brass, or polished chrome that mount horizontally.
Drawer dividers and interior organizers are underrated. Many modern vanities offer optional peg systems or adjustable trays. For around $30–60, these accessories turn a jumbled drawer into a functional grooming station.
Undermount sinks are the modern standard, they eliminate the lip that traps gunk and allow you to wipe crumbs straight into the sink. Pair with a countertop material that supports undermounting (quartz, solid surface, stone). Drop-in sinks work but create a visual seam that disrupts the slab aesthetic.
Open shelving below the countertop adds modern flair and easy access to towels or baskets, but it’s not for everyone. Open storage means visible contents and less dust protection. If you go this route, choose matching baskets or boxes to corral items, and expect to dust weekly.
Lighting integration is increasingly common. Some modern vanities include LED strip lighting along the underside (for floating models) or inside drawers. These typically run on 12V or 24V DC and plug into a wall outlet or are hardwired. Check if the driver/transformer is included and whether it’s UL-listed for damp locations (required in bathrooms per NEC Article 410).
Finish durability: Thermofoil and high-gloss acrylic are easy to clean but can show water spots. Matte lacquers hide fingerprints better but may scuff with abrasive cleaners. Natural wood veneer needs occasional oiling and isn’t ideal in high-humidity bathrooms unless properly sealed.
Installation Tips for DIY Homeowners
Installing a modern vanity is a manageable DIY project if you’re comfortable with basic plumbing and carpentry. Budget a full day for a single-sink vanity, a day and a half for a double. You’ll need help lifting anything over 100 lbs or wider than 48″.
Tools and materials:
- Stud finder and 4′ level
- Drill/driver with bits for wood and tile
- Adjustable wrench and basin wrench
- Hacksaw or tubing cutter (for supply line adjustments)
- Silicone caulk (clear or color-matched)
- Shims (wood or composite)
- Teflon tape or pipe dope
- Safety glasses and dust mask (especially if cutting tile or drywall)
Step-by-step process:
-
Shut off water at the angle stops (usually below the sink) or at the main if stops are corroded. Open the faucet to relieve pressure and catch residual water with a bucket.
-
Remove the old vanity. Disconnect supply lines and P-trap. If the vanity is caulked or screwed to the wall, slice caulk with a utility knife and back out screws. Watch for hidden fasteners behind drawers or inside cabinets.
-
Prep the wall. Patch any holes and touch up paint. If installing a floating vanity, locate studs and mark the mounting rail height, typically 32–34″ from the finished floor to the bottom edge of the cabinet. Use a level and mark both ends, then snap a chalk line or draw a level reference line.
-
Install the mounting hardware. For floating vanities, screw the cleat or hanging rail into studs using 3″ to 4″ wood screws or lag bolts. Confirm it’s level. If studs don’t align with the vanity’s internal mounting points, use a continuous 2×6 or 2×8 backer board screwed horizontally into multiple studs, then mount the cleat to that.
-
Position the vanity. Lift (with help) and hook it onto the rail, or set a freestanding unit in place. Check for level front-to-back and side-to-side. Use shims under freestanding bases as needed. Some floating vanities have adjustable brackets, loosen, level, then tighten.
-
Secure freestanding vanities. Drive screws through the back rail into studs. Pre-drill to avoid splitting. If no studs align, use toggle bolts or molly anchors rated for the load (check manufacturer specs).
-
Install the countertop and sink. If the countertop is separate, apply a bead of silicone along the cabinet top edge and set the slab. For undermount sinks, follow the manufacturer’s template for cutting the opening (if not pre-cut) and use sink clips or epoxy as specified. Vessel or drop-in sinks install after the countertop is in place.
-
Connect plumbing. Attach supply lines (braided stainless is easiest) to the faucet tailpieces and angle stops, hand-tighten, then a quarter turn with a wrench. Assemble the P-trap and connect to the drain stub-out. Use slip-joint washers and hand-tighten the nuts: overtightening cracks plastic fittings. Apply Teflon tape to metal threads.
-
Test for leaks. Turn water on slowly and inspect all connections. Tighten as needed. Run water for a few minutes and check under the sink with a flashlight.
-
Caulk and finish. Run a bead of silicone caulk along the backsplash joint (where countertop meets wall) and around the sink rim if it’s drop-in. Tool the caulk with a wet finger or caulk tool for a clean finish. Avoid caulking the underside of a floating vanity, leave it open for airflow unless the manufacturer specifies otherwise.
Permits and codes: Vanity replacement is typically considered a minor plumbing fixture swap and doesn’t require a permit in most jurisdictions if you’re not altering drain or supply line routing. But, if you’re moving plumbing, adding new electrical (like outlet or lighting), or doing structural changes, check with your local building department. Electrical work in bathrooms must meet NEC standards for GFCI protection and clearances from water sources.
When to call a pro: If your walls are plaster or old lath, mounting heavy floating vanities can be tricky, hire a carpenter or handyman familiar with historic construction. Likewise, if plumbing rough-in doesn’t match your new vanity’s layout, a licensed plumber can reroute drains and supplies to code. Concrete or tile walls may need specialized anchors or drilling, which is easier with a rotary hammer and masonry experience.
Taking time to plan measurements, confirm plumbing fit, and gather the right tools makes the difference between a smooth install and a frustrating weekend. When researching layouts and examples on platforms like Homify, note how professionals handle tricky clearances and asymmetrical spaces, those details often translate to real-world lessons.
Modern vanities offer sharp looks and practical features, but only if they’re sized right and installed properly. Measure twice, level carefully, and don’t skip the test run for leaks. With a solid plan and attention to the details that matter, stud placement, plumbing fit, and finish durability, you’ll end up with a vanity that performs as well as it looks.