A country style bathroom vanity brings warmth, character, and a touch of nostalgia to any bathroom renovation or remodel. Whether you’re drawn to weathered wood finishes, farmhouse sinks, or vintage-inspired hardware, the right vanity can anchor the entire space and set the tone for a cozy, lived-in aesthetic. The beauty of country design lies in its flexibility, it works equally well in a historic farmhouse, a suburban ranch, or even a modern home looking for contrast and texture. This guide walks through the key features, design considerations, and DIY options to help homeowners select, build, or style a country bathroom vanity that’s both functional and full of charm.
Table of Contents
ToggleKey Takeaways
- A country style bathroom vanity prioritizes natural wood, handcrafted details, and durability, bringing warmth and character to any bathroom while working well in farmhouses, suburban homes, or modern spaces seeking contrast.
- Distressed finishes, solid wood construction from pine, oak, or reclaimed wood, and vintage-inspired hardware like oil-rubbed bronze pulls are signature features that add authenticity and hide future wear in daily use.
- Farmhouse sinks with exposed apron fronts require substantial support—typically 2×4 blocking inside the cabinet—due to their 50 to 80-pound weight when empty, making solid framing essential for safe installation.
- Accurate measurements, consideration of sink configuration (single vs. double), and assessment of storage needs (open vs. closed) are critical when selecting a country vanity to ensure it fits your space and lifestyle.
- Converting an antique dresser, building a DIY shaker-style vanity, or refurbishing an existing vanity are budget-friendly weekend projects that add country charm without requiring professional installation.
- Seal all wood components with at least two coats of polyurethane and install moisture-resistant wall treatments like wainscoting or shiplap to protect against bathroom humidity and prevent warping or mold growth.
What Defines a Country Style Bathroom Vanity?
Country style isn’t a single rigid aesthetic, it’s a family of looks that share common ground: natural materials, handcrafted details, and a sense of history. At its core, a country bathroom vanity favors wood over synthetics, simplicity over ornamentation, and durability over trends.
Typically, country vanities are constructed from solid wood or wood veneers in species like pine, oak, maple, or reclaimed barn wood. Finishes range from natural stains that highlight grain patterns to painted surfaces in muted whites, soft grays, or sage greens. You’ll often see signs of wear, intentional distressing, hand-planed edges, or exposed joinery, that give the piece an aged, heirloom quality.
The silhouette is usually straightforward: a cabinet base with inset or shaker-style doors, open shelving, or a combination of both. Unlike sleek modern vanities with integrated sinks and seamless surfaces, country designs embrace visible seams, apron fronts, and freestanding or furniture-style construction. Some are repurposed antiques, old dressers, dry sinks, or workbenches retrofitted with plumbing cutouts. Others are new builds designed to look old, with details like bead-board panels, turned legs, and X-bracing that evoke early American or European farmhouse cabinetry.
Top Design Features for Country Style Vanities
Natural Wood Finishes and Distressed Details
Natural wood finishes are the backbone of country vanity design. Expect to see wide plank construction with visible knots, grain variation, and sometimes live edges. Pine and poplar are affordable softwoods that take paint and stain well, though they dent more easily than hardwoods. Oak and maple offer greater durability and a tighter grain, ideal for high-traffic family bathrooms.
Distressing techniques, wire brushing, chain distressing, sanding through paint layers, add texture and the appearance of age. These aren’t just aesthetic choices: they also hide future dings and scratches, making the vanity more forgiving in daily use. If you’re building or refinishing a vanity, use a random orbital sander with 80-grit paper on edges and corners, then follow with 120-grit to smooth the surface without removing all character.
Stain choices matter. Oil-based stains penetrate deeper and highlight grain, while water-based stains dry faster and produce less odor, important in a confined bathroom space. Seal with at least two coats of polyurethane (satin or semi-gloss) to protect against moisture. In a bathroom, water resistance is non-negotiable: unsealed wood will warp, split, or develop mold in high-humidity environments.
Farmhouse Sinks and Vintage Hardware
Farmhouse sinks, also called apron-front sinks, are a signature element of country bathroom vanities. These sinks feature a deep basin with an exposed front panel that extends beyond the cabinet face. Originally designed for utility and ergonomics, they’re now prized for their visual weight and rustic appeal. In bathrooms, smaller versions (typically 18 to 24 inches wide) work well for single-sink vanities. Materials include fireclay, cast iron, and porcelain, each with different durability and maintenance profiles. Fireclay resists chipping and staining but costs more: cast iron is durable and affordable but heavier, requiring solid cabinet construction and possibly additional floor support.
If retrofitting a farmhouse sink into an existing vanity, you’ll need to cut the cabinet front and possibly reinforce the frame. The sink’s weight, often 50 to 80 pounds when empty, demands solid framing, ideally 2×4 blocking inside the cabinet or a reinforced stretcher between the cabinet sides. Always check manufacturer specs for required support.
Vintage-inspired hardware completes the look. Oil-rubbed bronze, antique brass, or matte black bin pulls, knobs, and hinges add authenticity. For a bathroom collection at Homebase, shaker-style cabinetry pairs naturally with simple cup pulls or round knobs. Avoid overly ornate or shiny finishes, country style leans functional, not formal. When replacing hardware, measure existing hole spacing (standard is 3 or 4 inches center-to-center for pulls) to avoid drilling new holes or patching old ones.
Choosing the Right Country Vanity for Your Bathroom
Start with accurate measurements. Measure the width, depth, and height of the space where the vanity will sit, and note the locations of existing plumbing, electrical outlets, and light switches. Standard vanity depths run 21 inches, but country-style furniture pieces may be deeper, 24 to 30 inches, which can crowd a small bathroom. If converting an antique dresser, confirm there’s enough clearance for the sink bowl and plumbing underneath without hitting drawer boxes or frame rails.
Next, consider sink configuration. Single-sink vanities range from 24 to 48 inches wide: double-sink setups start at 60 inches and often require 72 inches or more for comfortable spacing. Country vanities frequently use undermount or vessel sinks plus to farmhouse styles. Undermount sinks create a cleaner counter and simplify cleanup: vessel sinks sit atop the counter and add a sculptural element but require taller faucets and can splash more.
Storage needs vary by household. Open shelving, common in country designs, offers easy access and a chance to display folded towels, woven baskets, or apothecary jars, but everything stays visible. Closed cabinets hide clutter and protect items from dust and humidity. Many country vanities blend both: cabinet doors on the bottom, open cubbies above or on the sides. If you have young kids or share a bathroom, prioritize closed storage to keep counters clear and hazards (cleaners, razors, medications) out of reach.
Finally, confirm the vanity’s construction quality. Solid wood or plywood is preferable to particleboard or MDF, especially in a bathroom where moisture is constant. Check for dovetail or mortise-and-tenon joinery in drawers and doors, signs of better craftsmanship and longevity. For inspiration on kitchen and bathroom remodels, look for vanities with adjustable shelves, soft-close hinges, and finished interiors, all of which signal a higher-quality product.
DIY Country Bathroom Vanity Ideas and Projects
Building or repurposing a country vanity is a weekend project for intermediate DIYers with basic carpentry skills. Here are three approachable options.
Option 1: Convert an Antique Dresser
Start with a solid wood dresser, estate sales, thrift stores, and online marketplaces are good sources. Look for pieces 30 to 36 inches tall (standard vanity height is 32 to 36 inches including countertop) and 36 to 48 inches wide. Remove the top drawers to accommodate plumbing. Cut access holes in the back panel for supply lines and drain using a jigsaw or hole saw. Seal all cut edges and interior surfaces with primer and polyurethane to prevent moisture damage.
Attach a new countertop, butcher block, quartz, or a marble remnant, using construction adhesive and screws from underneath. Install the sink and faucet according to manufacturer instructions, ensuring all connections are watertight. If the dresser has a finished back, you may need to notch or remove portions to fit against the wall. Always use a level during installation: even minor tilt can cause drainage problems or countertop cracking.
Option 2: Build a Simple Shaker-Style Vanity
Construct a basic cabinet frame from 2×2 or 2×4 framing lumber for the legs and stretchers, then add ¾-inch plywood panels for sides, back, and shelves. Cut shaker-style door frames from 1×3 or 1×4 pine, with a ¼-inch plywood center panel set into a routed groove (a router with a ¼-inch straight bit makes this easy). Assemble doors with glue and pocket screws or biscuit joints.
Paint or stain all components before final assembly. Install European-style hinges (also called cup hinges) for easy adjustment and a clean look. Add a stone or wood countertop, undermount or vessel sink, and wall-mount or deck-mount faucet. Total material cost typically runs $200 to $400 depending on your countertop and sink choices, plus another $50 to $100 for hardware and finish.
Option 3: Refurbish a Builder-Grade Vanity
If you already have a basic vanity in place, you can add country character without starting from scratch. Remove doors and drawer fronts, then sand and repaint in a muted color, chalky white, dove gray, or soft blue. Replace flat-panel doors with shaker-style replacements (available unfinished from home centers for around $15 to $30 per door). Add bead-board paneling to the cabinet sides using ¼-inch panels and construction adhesive, then paint to match.
Swap out the countertop for butcher block or a concrete overlay (a DIY-friendly option using a feather-finish cement product). Replace the sink and faucet with more rustic styles, and finish with new hardware. This approach works well for renters or budget-conscious renovators who want a fresh look without demolition or plumbing relocation.
Safety and Code Notes
Any work involving plumbing or electrical requires attention to local codes. Most jurisdictions require GFCI-protected outlets within 6 feet of a water source. If relocating plumbing, hire a licensed plumber or check your local building department for permit requirements, improper drain slope or venting can cause chronic clogs and sewer gas intrusion. Always shut off water at the supply valves or main shutoff before disconnecting any plumbing, and have a bucket and towels ready for residual water.
Styling Tips to Complete Your Country Bathroom Look
Once the vanity is in place, layer in details that reinforce the country aesthetic without cluttering the space.
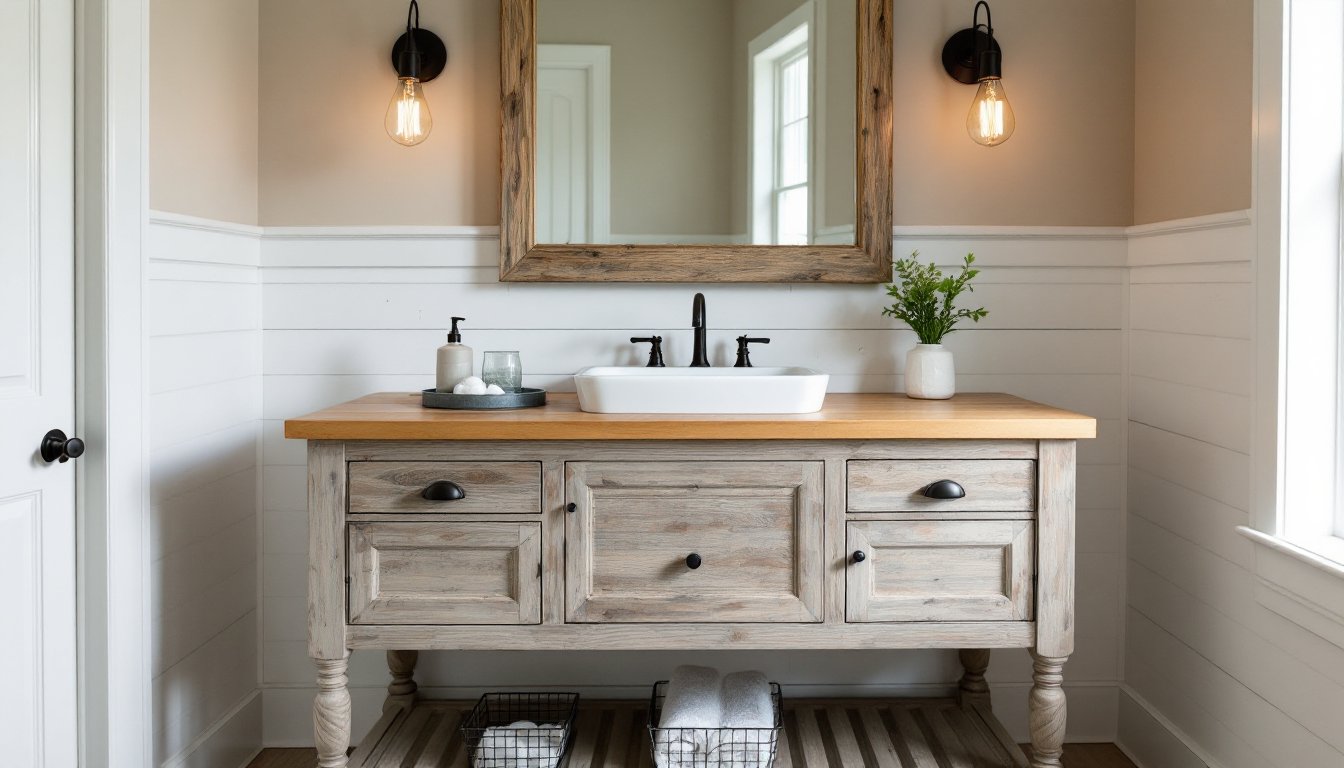
Lighting plays a huge role. Swap out builder-grade vanity bars for fixtures with an aged or industrial feel, wire cage sconces, barn-style pendants, or wrought iron candelabras. For the best task lighting, mount fixtures at 60 to 66 inches from the floor (or about 18 inches above the countertop) and space them evenly on either side of the mirror if possible. Overhead lighting alone casts shadows: side-mounted fixtures illuminate faces more evenly.
Mirrors in country bathrooms often feature wood frames, reclaimed barn wood, painted shiplap, or simple stained trim. For a Southern home design twist, consider arched or arched-top mirrors that echo traditional architecture. A large mirror (at least 30 inches wide for a single vanity) makes a small bathroom feel more spacious and reflects light from windows or fixtures.
Textiles add warmth and color. Choose cotton or linen towels in whites, soft grays, or muted florals, and display them rolled in wire baskets or folded on open shelves. A cotton or jute rug underfoot softens hard tile and adds texture, but make sure it has a non-slip backing and can tolerate moisture. Avoid synthetic materials that trap odors or mildew easily.
Accessories should feel collected, not matched. A galvanized metal tray corrals soap dispensers and hand lotion: a small enamelware pitcher holds toothbrushes or cotton swabs. Apothecary jars with wood or metal lids store cotton balls, bath salts, or decorative fillers. Resist the urge to over-style, country spaces feel best when functional items do double duty as decor.
Finally, pay attention to wall treatments. Shiplap, bead-board wainscoting, or board-and-batten paneling all reinforce country character and protect walls from moisture. Install wainscoting to a height of 32 to 42 inches and paint or stain to coordinate with the vanity. Seal any paneling in a bathroom with a moisture-resistant primer and topcoat to prevent warping or mold growth, especially in poorly ventilated spaces. If adding paneling, locate studs with a stud finder and use finishing nails or a pneumatic nailer to secure panels, then fill and sand nail holes before painting.